Selfmade Cruffins – Sally’s Baking Habit

Try our newest merchandise


Buttery and flaky croissant dough will get snarled with a beneficiant dose of cinnamon-sugar and baked in a muffin pan, combining two tasty treats into one: croissants + muffins = cruffins. In the event you’re searching for a brand new one-day baking problem, this distinctive pastry is a enjoyable one to attempt. And completely scrumptious to eat! That is an egg-free baking recipe.

What Are Cruffins?

Cruffins are a pleasant hybrid of two beloved bakery treats: croissant dough baked right into a fantastically spiraled muffin form. After I determined to make a do-it-yourself model, I needed to be taught extra about their origin. It seems cruffins have been first created in Melbourne, Australia, by Lune Croissanterie and later made their strategy to the U.S., due to Australian pastry chef Ry Stephen.

And we will all agree—this buttery masterpiece was a creation value promoting!


Let’s Attempt an Approachable Selfmade Model

In case you have ever taken the time to make flaky, buttery croissants from scratch, you’ll know that do-it-yourself pastry requires time, precision, and persistence, however is a really rewarding baking mission. I do know it could actually appear intimidating, however I completely break down the method for you, step-by-step, within the tutorial under.

*Bakery cruffins are normally taller than in the present day’s do-it-yourself model as a result of they’re baked in deeper pans, corresponding to popover pans. Since many residence bakers don’t have popover pans, this recipe is designed for the standard muffin pan.

Selfmade cruffins don’t require any particular elements, however they do require 4 rounds of 20-minute refrigerations, 3 rounds of rolling-and-folding (laminations), and a pair of rises. For these causes, I categorize this as a sophisticated baking recipe. However I’m right here to stroll you thru every step.

You may completely do that!

Begin by Making the Dough

The bottom dough for these cruffins is similar yeasted dough we use to make this croissant bread loaf, which is a scaled-down model of my recipe for do-it-yourself croissants.

You want very fundamental elements: entire milk, yeast, sugar, salt, butter, and all-purpose flour. I like to recommend European-style butter right here. It has a better fats content material than American-style butter, giving it a richer taste. Whereas the distinction is delicate in lots of baked items, it turns into extra noticeable in recipes the place the butter in the principle ingredient… like cruffins!

Not solely did my staff and I discover higher taste, the dough was simpler to roll out when laminated with European-style butter. It’s softer, which made the dough extra pliable… and the method simpler! 😉

ingredients on marble surface including flour, butter, sugar, yeast, and milk.

In case you have a stand mixer with a dough hook attachment, you should use that to make and knead the dough, nevertheless it’s not required. See my Tips on how to Knead Dough tutorial when you want any additional assist with the kneading step.

When the dough is able to rise, cowl it and let it rise for round 2 hours, till it’s practically doubled in dimension. Gently punch down the risen dough to deflate it:

dough pictured in glass bowl after 1st rise and pictured after punching downdough pictured in glass bowl after 1st rise and pictured after punching down

Roll the dough into a ten×14-inch rectangle on a evenly floured silicone baking mat or piece of parchment paper. In case your baking mat has a border like a Silpat (pictured under), you should use the border of the baking mat as your information—it’s like having a cheat sheet!

Place the baking mat on a baking sheet, cowl, and refrigerate for 20 minutes. Throughout this primary refrigeration, put together for the lamination.


In Photographs: Lamination Course of

Laminating dough is the method of folding butter into dough many instances, which creates a number of alternating layers of butter and dough. When the laminated dough bakes, the butter melts and creates steam. This steam lifts the layers aside, leaving us with dozens of flaky ethereal buttery layers. We obtain one thing comparable in tough puff pastry, pie crust, and biscuits.

The butter you employ for laminating this cruffin dough ought to be barely softened however nonetheless cool—about 60–64°F (15–18°C) is right. You need it to be about the identical temperature because the refrigerated dough. In case you have an instant-read thermometer, you’ll be able to insert it in each the butter and the dough to test.

With a mixer, beat the butter with a Tablespoon of flour. I realized this from Zoe at Zoe Bakes. (Please go observe Zoe, she is the very best!) Begin with softened butter and beat it with flour so it has some stability, which makes laminating simpler.

1st lamination: Take away the dough from the fridge and unfold the overwhelmed butter down the center third of the dough with a sturdy knife, leaving a ½-inch border on the prime and backside:

spreading butter on dough on top of silicone baking mat.spreading butter on dough on top of silicone baking mat.

Fold the edges of the dough over the butter, such as you’re folding a letter into thirds:

hands folding dough over lamination butter layer on top of silicone baking mat.hands folding dough over lamination butter layer on top of silicone baking mat.

Pinch the highest and backside ends to seal the butter inside. Flip the dough 90 levels, so the longer aspect is horizontal in entrance of you. Sprinkle with flour. Roll out to 9×12 inches.

Fold in thirds once more:

hands folding dough over itself on top of silicone baking mat.hands folding dough over itself on top of silicone baking mat.

Cowl and refrigerate for 20 minutes.

2nd lamination: Flip the dough horizontally in entrance of you, and roll it out to 9×12 inches once more. Fold in thirds. Flip 90 levels. Roll out to 9×12 inches once more. Fold in thirds. Cowl and refrigerate for 20 minutes.

third lamination: Repeat the identical steps because the 2nd lamination. Cowl and refrigerate for 20 minutes.

3 Lamination Success Ideas

  1. Don’t lengthen the time between laminations, or it should change into too stiff and tough to roll out.
  2. It’s OK if there are air bubbles within the dough; your rolling pin will pop them.
  3. If the butter begins coming by way of the dough in spots, sprinkle some flour over it and proceed to roll. You could have to flip the dough the wrong way up and sprinkle extra flour on the underside to maintain it from sticking to the baking mat/your work floor.

Shaping the Cruffins

Lower the chilled dough into 3 roughly equal parts. They need to every weigh round 300–340g, give or take. Take one dough portion and roll it out to eight×12 inches; it should maintain shrinking again and never attain these dimensions but. Set it apart to relaxation when you roll out the following piece. Set that one apart. Roll out the final piece and set it apart.

hands rolling small block of folded dough on silicone baking mat.hands rolling small block of folded dough on silicone baking mat.

Take the primary piece you rolled out and roll it out once more. After its brief relaxation, it ought to be a lot simpler now to roll it out to be 8×12 inches. Re-flour and flip the dough over as wanted to maintain it from sticking to the floor or rolling pin:

hands rolling folded dough on silicone baking mat.hands rolling folded dough on silicone baking mat.

Sprinkle the floor with cinnamon-sugar.

With a pizza cutter or sharp knife, reduce 1-inch strips of dough.

dough rolled out on surface covered in cinnamon sugar and cut into 12 strips.dough rolled out on surface covered in cinnamon sugar and cut into 12 strips.

Working with 3 strips at a time, layer them on prime of each other. Roll them up collectively in a spiral cinnamon-roll form:

hands layering strips of dough and shown again rolling layered dough into a cinnamon-roll shape.hands layering strips of dough and shown again rolling layered dough into a cinnamon-roll shape.

Place in a single nicely of a greased muffin pan. Repeat with the remaining strips to get 4 cruffins.

HAVE NO WORRIES: Needless to say your cruffins might look barely completely different from these photographs, and from one another. That’s OK! Due to the best way we’re shaping them, every cruffin bakes up a bit in another way. When you roll the baked cruffins in sparkly cinnamon-sugar on the finish, they in some way all look uniquely stunning, irrespective of how they seemed within the muffin pan.

Now repeat this shaping course of with the remaining 2 parts of dough—you’ll find yourself with 12 cruffins. Evenly cowl the cruffins and allow them to rise for 1 hour.

overhead image of cruffins in mufifn pan before baking.overhead image of cruffins in mufifn pan before baking.

The cruffins take about 25–28 minutes to bake. In the event you test one with an instant-read thermometer, they’re carried out when the interior temperature reaches 200°F (93°C).

overhead image of baked cruffin pastries in muffin pan.overhead image of baked cruffin pastries in muffin pan.

Let the cruffins cool barely within the pan, nearly 10 minutes. As soon as they’re cool sufficient to deal with however nonetheless heat, roll them within the remaining cinnamon-sugar. (Be happy to make some additional cinnamon-sugar if you wish to be beneficiant together with your coating!)

hands rolling cruffin pastry in cinnamon sugar.hands rolling cruffin pastry in cinnamon sugar.

Non-obligatory Filling

These cruffins are excellent as is, however if you wish to take them one step additional, you’ll be able to fill them. These cinnamon-sugar cruffins style totally fabulous with Nutella, and different fillings corresponding to jam, lemon curd, or pastry cream are equally scrumptious.

Like after we fill cupcakes, a protracted skinny piping tip is nice for this activity. I exploit Wilton #230 to fill cruffins. Poke a gap within the middle of a cruffin with a skewer, insert the piping tip into the opening, and squeeze the piping bag till the filling reaches the highest of the cruffin.

Try these layers:

nutella stuffed cruffin on small plate.nutella stuffed cruffin on small plate.

I hope you get pleasure from diving into this excellent layered, laminated world of buttery pastry!

Useful Instruments for Making Cruffins

Print
clock clock iconcutlery cutlery iconflag flag iconfolder folder iconinstagram instagram iconpinterest pinterest iconfb fb iconprint print iconsquares squares iconcoronary heart coronary heart iconcoronary heart stable coronary heart stable icon

Description

Buttery and flaky croissant dough will get snarled with a beneficiant dose of cinnamon-sugar and baked in a muffin pan, combining two tasty treats into one unimaginable hybrid: croissants + muffins = cruffins. Bakery cruffins are normally taller than this do-it-yourself model as a result of they’re baked in deeper pans, corresponding to popover pans. Since many residence bakers don’t have popover pans, this recipe is designed for the standard muffin pan.


Dough

Lamination

Filling & Coating


  1. Preliminary notes: Use the step-by-step photographs as visuals earlier than you start. Learn the recipe directions and notes earlier than starting. Make room within the fridge on your baking sheet for steps 6–10.
  2. Put together the dough: Whisk the nice and cozy milk, yeast, and sugar collectively within the bowl of your stand mixer fitted with a dough hook attachment. Cowl and permit combination to take a seat for about 5 minutes or till foamy on prime. *If you don’t personal a mixer, you are able to do this in a big mixing bowl and within the subsequent step, combine the dough along with a big wood spoon/silicone spatula. A hand mixer works, however the sticky dough repeatedly will get caught within the beaters. Mixing by hand with a wood spoon or silicone spatula is a better option.*
  3. Add the butter, 2 cups (250g) of flour, and the salt. Beat on medium velocity for two minutes, stopping and scraping down the bowl as wanted to assist the combination mix. There should still be chunks of butter—that’s okay. Add the remaining 1 cup (125g) of flour, scrape down the bowl as wanted, and beat on low velocity till a comfortable dough varieties and pulls away from the edges of the bowl. Dough will probably be comfortable, however not overly sticky. Beat in 2 extra Tablespoons of flour if dough appears very sticky. Keep away from including extra flour than you want.
  4. Knead the dough: Maintain the dough within the mixer and beat for an extra 5 full minutes, or knead by hand on a evenly floured floor for five full minutes. (In the event you’re new to bread-baking, my Tips on how to Knead Dough video tutorial will help right here.) If the dough turns into too sticky throughout the kneading course of, sprinkle 1 teaspoon of flour at a time on the dough or on the work floor/within the bowl to make a comfortable, barely cheesy dough. Don’t add extra flour than you want as a result of you don’t want a dry dough. After kneading, the dough ought to nonetheless really feel a bit comfortable. Poke it together with your finger—if it slowly bounces again, your dough is able to rise. You can even do a “windowpane check” to see in case your dough has been kneaded lengthy sufficient: tear off a small (roughly golfball-size) piece of dough and gently stretch it out till it’s skinny sufficient for gentle to cross by way of it. Maintain it as much as a window or gentle. Does gentle cross by way of the stretched dough with out the dough tearing first? In that case, your dough has been kneaded lengthy sufficient and is able to rise. If not, maintain kneading till it passes the windowpane check.
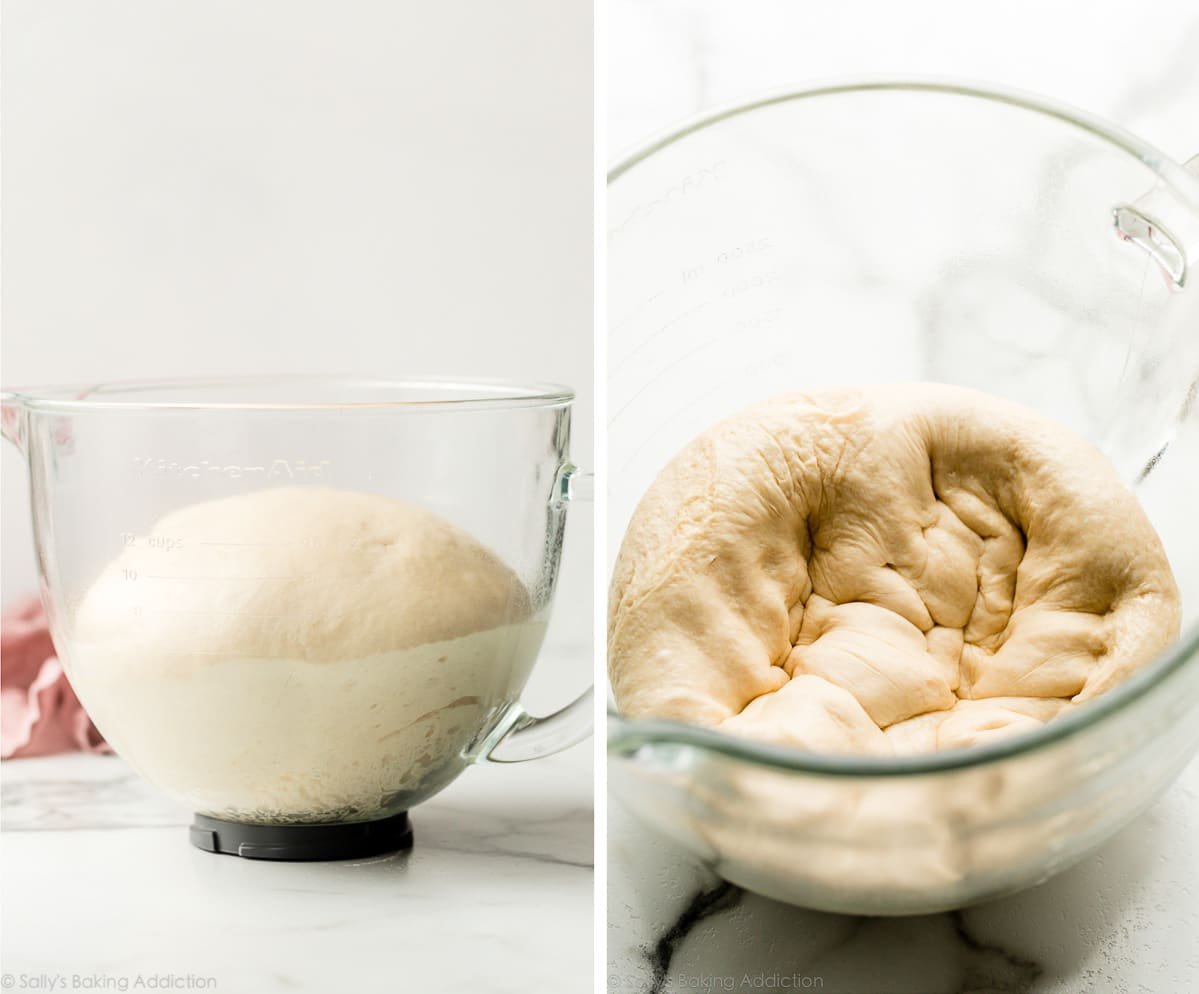
  5. 1st rise: Evenly grease a big bowl with oil or use nonstick spray. Place the dough within the bowl, turning it to coat all sides of the dough within the oil. Tightly cowl the bowl and permit the dough to rise in a comparatively heat atmosphere for round 2 hours or till practically double in dimension. (For a tiny discount in rise time, see my reply to The place Ought to Dough Rise? in my Baking with Yeast Information.)
  6. Flatten dough: Gently punch down the dough to launch the air. Place dough on a silicone baking mat-lined, parchment paper-lined, or evenly floured baking sheet. (I extremely advocate a silicone baking mat as a result of you’ll be able to roll the dough out within the subsequent steps immediately on prime and it gained’t slide all around the counter.) Gently flatten the dough out into a ten×14-inch (25x35cm) rectangle utilizing evenly floured fingers to rigorously stretch, however not tear, the dough. Evenly cowl and place your complete baking sheet within the fridge, and permit the lined dough to relaxation and chill for 20 minutes. Don’t lengthen this time.
  7. In the meantime, put together for lamination: Ensure that the butter is barely softened however nonetheless cool, between 60–64°F (15–18°C) is right. Utilizing a hand mixer or a stand mixer fitted with a paddle attachment, beat the butter and 1 Tablespoon flour collectively till fully mixed. It’s necessary to notice the next 3 suggestions earlier than you start laminating: (1) Have a bowl of flour at hand to repeatedly flour your floor and rolling pin as wanted. If the dough tears and butter is uncovered, sprinkle the uncovered butter with flour. (2) If the dough is not possible to roll, attempt flipping it over. If it’s nonetheless not possible to roll, cowl and let it relaxation for five minutes earlier than attempting once more, to let the gluten calm down. And (3) Don’t lengthen the refrigeration instances, as a result of the folded dough will start to over-expand, and it’ll additionally change into very tough to roll out.
  8. 1st lamination: Take away dough from the fridge and set the baking sheet apart. I prefer to maintain the dough on the silicone baking mat after I’m rolling it as a result of the mat is nonstick. Working with the longer (14-inch) edge in entrance of you, unfold the overwhelmed butter down the middle of the dough, overlaying the middle third of the dough. Fold one dough edge over on prime of butter, and fold different edge on prime of that (like folding a enterprise letter). Pinch/seal the 2 brief ends to surround butter inside. Rotate dough so the lengthy edge is horizontally in entrance of you. Evenly flour the highest of the folded dough and, utilizing a evenly floured rolling pin, roll out to a 9×12-inch (23x30cm) rectangle. Fold dough edges over on prime like folding a enterprise letter. Cowl dough, place again on baking sheet, and refrigerate 20 minutes. Don’t lengthen this time.

    spreading butter on dough on top of silicone baking mat.spreading butter on dough on top of silicone baking mat.
    hands folding dough over lamination butter layer on top of silicone baking mat.hands folding dough over lamination butter layer on top of silicone baking mat.
    hands folding dough over lamination butter layer on top of silicone baking mat.hands folding dough over lamination butter layer on top of silicone baking mat.
    hands folding dough on top of silicone baking mat.hands folding dough on top of silicone baking mat.
    hands rolling folded dough with rolling pin on silicone baking mat.hands rolling folded dough with rolling pin on silicone baking mat.
    hands folding dough over itself on top of silicone baking mat.hands folding dough over itself on top of silicone baking mat.
    hands folding dough over itself on top of silicone baking mat.hands folding dough over itself on top of silicone baking mat.

  9. 2nd lamination: Take away dough from the fridge and set baking sheet apart. Rotate dough so the lengthy edge is horizontally in entrance of you. Evenly flour the highest of the folded dough and, utilizing a evenly floured rolling pin, roll out to a 9×12-inch rectangle. Fold dough edges over on prime like folding a enterprise letter. Rotate dough horizontally and repeat rolling out to 9×12 inches and folding like a enterprise letter. Cowl dough, place again on baking sheet, and refrigerate 20 minutes
  10. third lamination: Take away dough from the fridge and set baking sheet apart. Rotate dough so the lengthy edge is horizontally in entrance of you. Evenly flour the highest of the folded dough and, utilizing a evenly floured rolling pin, roll out to a 9×12-inch rectangle. Fold dough edges over on prime like folding a enterprise letter. Rotate dough horizontally and repeat rolling out to 9×12 inches and folding like a enterprise letter. Cowl dough, place again on baking sheet, and refrigerate 20 minutes
  11. Form & fill: Evenly grease a regular 12-cup muffin pan. In a medium bowl, combine collectively the sugar and cinnamon. Take away dough from the fridge and set baking sheet apart. Place the chilled dough on a reducing board and reduce into 3 even rolls. (You can even reduce the dough into thirds proper on the silicone baking mat, however ensure you will not be utilizing an excellent sharp knife in your baking mat—I exploit a bench scraper.)

    dough scraper cutting folded dough into 3 pieces.dough scraper cutting folded dough into 3 pieces.

  12. (Notice: this step can get messy!) Evenly flour your work floor and rolling pin. Working with one portion of dough at a time, roll out to an 8×12-inch rectangle. If it retains shrinking again as you attempt to roll it out, let it relaxation for five minutes after which attempt once more. It’ll ultimately calm down sufficient to get to 12 inches in size. Sprinkle evenly with 2 Tablespoons of cinnamon-sugar, and use the again of a spoon or a spatula to press it down into the dough. With a pizza cutter or sharp knife, reduce 12 1-inch strips of dough. You may mark them out first with a ruler/measuring tape and a knife. Working with 3 strips at a time, layer them on prime of each other. Roll them up collectively in a spiral and tuck the ends beneath. Place in a single cup of the ready muffin pan. Repeat this step with the remaining 2 parts of dough to get 12 cruffins.

    hands rolling small block of folded dough on silicone baking mat.hands rolling small block of folded dough on silicone baking mat.
    hands rolling folded dough on silicone baking mat.hands rolling folded dough on silicone baking mat.
    dough rolled out on surface covered in cinnamon sugar and cut into 12 strips.dough rolled out on surface covered in cinnamon sugar and cut into 12 strips.
    hands layering strips of dough and shown again rolling layered dough into a cinnamon-roll shape.hands layering strips of dough and shown again rolling layered dough into a cinnamon-roll shape.
    hands rolling dough in a cinnamon roll shape.hands rolling dough in a cinnamon roll shape.

  13. Cowl cruffins evenly and permit to rise for 1 hour, till puffy.
     
    overhead image of cruffins in mufifn pan before baking.overhead image of cruffins in mufifn pan before baking.
  14. Preheat the oven to 350°F (177°C).
  15. Bake for 25–28 minutes, or till the interior temperature reaches 200°F (93°C). Take away from the oven and let the cruffins barely cool within the pan set on a cooling rack.
  16. Coat the cruffins and fill, if desired: As soon as cool sufficient to deal with, roll every cruffin within the remaining cinnamon-sugar. At this level you’ll be able to benefit from the cruffins plain, or fill them together with your filling of alternative. Fill a piping bag (reusable or disposable) fitted with a protracted, skinny filling tip, corresponding to Wilton 230, with the filling. Poke a gap 3/4 of the best way down into the cruffin with a skewer (or simply insert the lengthy piping tip) and squeeze to fill the cruffin.

    hands rolling cruffin pastry in cinnamon sugar.hands rolling cruffin pastry in cinnamon sugar.

  17. Cowl and retailer leftover cruffins lined at room temperature for as much as 3 days.

Notes

  1. In a single day Dough Directions: After step 12, tightly cowl the formed cruffins within the pan and refrigerate for as much as about 12 hours. Not less than 2 hours earlier than you want the cruffins the following day, take away from the fridge, maintain lined, and permit to rise on the counter for about 1 hour earlier than baking. Alternatively, you’ll be able to let the dough have its 1st rise (step 5) within the fridge in a single day. Cowl the dough tightly and place within the fridge for as much as 12 hours. Take away from the fridge and permit the dough to completely rise for two extra hours. Proceed with step 6.
  2. Freezing Directions: After the coated cruffins cool fully, wrap every individually in plastic wrap and place in a freezer-friendly container. Freeze as much as 3 months. Thaw at room temperature. I don’t advocate freezing this dough earlier than lamination as a result of it makes laminating tough. I additionally don’t advocate freezing the formed unbaked cruffins, as they’ll merely not puff up within the oven.
  3. Particular Instruments (affiliate hyperlinks): Stand Mixer (most well-liked), Hand Mixer, or Glass Mixing Bowl with Wood Spoon / Silicone Spatula | Silicone Baking Mat or Parchment Paper | Baking Sheet | Instantaneous-read Thermometer | Rolling Pin | Bench Scraper | Pizza Cutter | 12-count Muffin Pan | Cooling Rack | Piping Bag (Reusable or Disposable) | Lengthy, skinny piping tip corresponding to Wilton #230
  4. Milk: Entire milk is right, however you’ll be able to swap a lower-fat or non-dairy milk. Keep away from nonfat milk.
  5. Yeast: You should use energetic dry or immediate yeast on this recipe. Observe the entire identical directions. If utilizing energetic dry yeast, the rise instances are normally *barely* longer, however not a lot. Reference my Baking with Yeast Information for solutions to widespread yeast FAQs.
  6. Butter: I strongly advocate European-style butter right here, and you should use salted or unsalted within the dough. I strongly advocate salted butter for the lamination course of. I exploit Kerrygold model butter. It has a better fats content material than American-style butter, giving it a richer taste. Not solely did my staff and I discover higher taste, the dough was simpler to roll out when laminating with European-style butter. Moreover, it’s necessary to make certain your lamination butter will not be too chilly/exhausting and also you don’t need it too greasy/comfortable both, as a result of it must be about as pliable because the dough to include into it. To be exact, it’s excellent each the dough and lamination are between 60–64°F (15–18°C).
  7. Popover Pan Directions For Taller Cruffins: Lower 2-inch strips as an alternative of 1-inch strips and swirl 2 strips collectively as an alternative of three. The bake time is about the identical, or a minuet or 2 longer.
  8. Egg Wash: Although I don’t sometimes apply one, you’ll be able to brush the formed cruffins after rising (after step 13) with an egg wash for a golden, shiny end. Egg wash = 1 egg blended with 1 Tablespoon milk.

Cruffins have been first created in Melbourne, Australia, by Lune Croissanterie and made well-liked within the U.S., due to Australian pastry chef Ry Stephen. Dough recipe developed from croissant loaf.


We will be happy to hear your thoughts

Leave a reply

Yummy Potz
Logo
Shopping cart